User Manual
Glazir Exporter User Manual
Explains the entire process of exporting a Revit model to a glTF file format that can be used in a web browser, encrypting it, and uploading it to Google Drive.
01
Installation
- If Revit is running, close it first.
- Run the installation file(
Glazir Exporter x.x.x.msi). - Follow the on-screen instructions Installation → Agree to the license → Proceed to completion.
- When you run Revit, a tab Windsoft appears in the ribbon, and within it Glaziryou can see the group and Export button.
Supported Versions — Supports Revit from 2019 to 2026. During installation, the configuration matching the Revit version installed on your PC will be installed automatically.
If an older version is installed,
installing over the previous version of the same program will automatically upgrade it. Settings, saved passwords, and Google login remain unchanged.
02
Opening the Revit Glazir Export Window
- Open the model to export 3D ViewSwitches to. Export operates based on the 3D view currently visible on the screen.
- from the ribbon Windsoft Tab → Export Press the button.
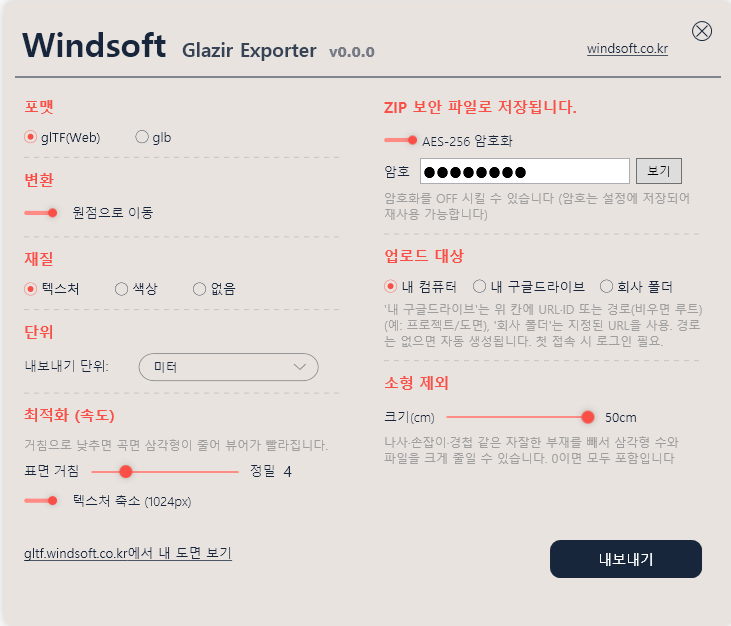
- The export settings window opens. On the left, there are format, material, unit, and optimization options, and on the right, there are security and upload-related options.
It only works in 3D view. Exporting does not work in plan or sheet views, so please open a 3D view first. Elements hidden in the view will also be skipped during export.
03
Default upload target (save to my computer)
- Target for upload My computerCheck to make sure it is selected.
- Export Press the button.
- Set the storage location and file name. The default name is the currently opened Revit file name, and the output is
.zipIt is saved as a single file. - When the conversion is complete, the saved folder opens in File Explorer, and the web viewer (glazir.windsoft.co.kr) opens in the browser as well.
The ZIP contains model files (gltf + bin or a single glb). When using it in a viewer or other programs, you can use it by extracting it.
04
Option Description
Format
| Selection | Explanation |
|---|---|
| glTF | Model structure(.gltf) and data(.bin) is divided into formats. It is easy to check or edit the content. |
| glb | The format contains all the data in a single file, so the file size is large. |
Material
| Selection | Explanation |
|---|---|
| Texture | Includes the texture image of the material. Appears most realistic but increases file size. |
| Color | Exports only the material color without texture. File size becomes smaller. |
| None | Exports only the geometry without the material. |
Unit
Sets the unit for exported coordinates. Choose according to the unit expected by the receiving program. Common web viewers use meters.
Optimization (Speed)
| Options | Explanation | Default |
|---|---|---|
| Surface Roughness | Sets how finely to subdivide curved surfaces (1 coarse ~ 15 precise). Lowering the number reduces the number of triangles, making the viewer faster. | 8 |
| Texture Reduction | Reduces textures larger than 1024px when exporting. The difference on screen is minimal and loading is faster. | ON |
| Exclude Small Parts | Excludes parts smaller than the specified size (cm) (screws, handles, hinges, etc.) from export. 0 includes all. | 0 |
Recommended settings when the viewer is slow — Try Surface Roughness 4–6, Texture Reduction on, Exclude Small Parts 5–10cm. This range balances quality and speed well.
05
Password ZIP
- On the right ZIP SecurityEnable AES-256 Encryption.
- When the password input field appears, enter the password to use. The password will be saved and used for the next export as well.
- If you want to check the password you entered, press the Show button on the right. Pressing it again will hide it.
- Afterwards, all ZIPs you export will be locked with this password.
How to open on the receiving side — ZIPs locked with AES-256 cannot be opened with the default extractor in Windows Explorer. Bandizipor 7-Zip similar programs must be used to enter the password and extract. Please provide this information when sending the file.
06
Google Drive Upload
Upload target
| Target | Action |
|---|---|
| My computer | Save as ZIP on PC. Do not upload. |
| My Google Drive | Upload to the drive of my Google account. The file will go to the location entered in the folder field below. |
| Company folder | Upload to the public folder designated by the company. (Can be changed in the folder field) |
When uploading to the drive, no save dialog appears, and no file remains on the PC. The file is created in a temporary folder and is immediately deleted after the upload is complete.
Specify folder
You can write in the folder field in three ways.
- Folder URL — Open the drive folder in the browser, copy the address as it is, and paste it here.
- Folder ID — You can paste just the long string after
/folders/in the URL. - Path —
ProjectA/DrawingsIf you write it like this, it will find and retrieve the folder; if it does not exist, it will be automatically created.
If left empty, it will be saved at the top level of My Drive. Folders are remembered separately for each target (My Google Drive / Company folder).
First upload — Google login
- When you start the first upload, a browser will open and the Google login screen will appear.
- Log in with the Google account you want to use for uploading and grant permission.
- When the 'Authentication Complete' screen appears, close the browser and return to Revit. The upload will continue.
- From next time, it will upload directly without login.
If the 'App not verified by Google' screen appears — this message appears when the app is still in the pre-review stage. Continue(or 'Advanced' → 'Go') to proceed normally.
Permission scope — This program drive.file only uses the required permissions. Apart from files uploaded directly by the program, it does not access any other files in the drive.
07
Opening Exported Files
Once the export is finished, the web viewer (glazir.windsoft.co.kr) will open automatically. You can immediately view the exported model in the browser.
- Clicking on elements in the viewer shows the same properties (ElementId, category, parameters) as seen in Revit.
- In the settings window, the 'View My Drawings on glazir.windsoft.co.kr' link allows you to open the viewer anytime.
- glTF is a standard format, so it can be opened in other viewers or game engines like Three.js, Babylon.js, etc.
08
Frequently Asked Questions
The export button doesn't work / It says 'No elements to export'
This appears when you are not in 3D view, or when there are no elements visible in the current view. Switch to 3D view and make sure the model is visible on the screen, then try again.
The exported ZIP won't open in Windows Explorer
The file was exported with AES-256 encryption enabled. The default Windows extractor does not support this method, so please enter the password in Bandizip or 7-Zip to extract it.
The model is too slow in the viewer
Try exporting again after adjusting the optimization options. It is recommended to lower the surface roughness to 4–6, enable texture reduction, and set small object exclusion to 5–10cm first.
Changing the material to 'color' will make the file much lighter. This is often sufficient if the purpose is to review the shape.
Drive upload fails
If you are uploading to a company folder, the Google account you are logged in with must have edit permissions for that folder. Check the folder's sharing settings.
If the upload fails, the file remains in a temporary folder, and the prompt displays the path. The file will not disappear, so you can copy it directly from that path.
I want to change my Google account
In the user's folder Windsoft In the folder gdrive_token.json If you delete the file, the login screen will appear the next time you upload. At that time, you can log in with the desired account.
Where can I see the logs when a problem occurs?
Under the user folder Windsoft\windsoft_log.txt The export process is recorded in the file. If you send this file when making an inquiry, we can find the cause more quickly.
Inquiries
Issues that are not resolved Please notify us through the inquiry page.